Showing posts with label kanban stamps. Show all posts

Tuesday, 12 November 2013

Clean & Simple Monochrome Window Scene Christmas Card

This card is most definitely a departure from the norm for me!  It's the launch of the new theme over on an Oldie but A Goodie Challenge and this fortnight it's Clean and Simple Christmas.  I've also got details of an exciting competition from Tonic Studios with a chance to win a prize worth £300.


Card Recipe:
Stamp: Kanban
Colouring Mediums: Versamark Black Ink
Paper and Card: Neenah White, Crafter's Companion Matt Black
Tools: Tonic Studios Window Die, Tonic Studios Christmas Sentiments, Embossalicious Embossing Folder
Embellishments: rhinestone crystal!
The main image is a Kanban set of stamps, the deer are separate to the main tree image, and I used a masking technique to stamp the baby deer so she appears to be peeking out from behind the tree.  I think that little baby deer is just sooo sweet!

Isn't this just such a gorgeous image?  It's really suited to a CAS card, as it just doesn't need adornment.

The window is one of my favourite dies from Tonic Studios, I'm currently going through a phase of window scene cards, I think they are so effective.  I didn't use acetate on this occasion, as I've kept the feel of the card quite matt.  I think that this would definitely be a suitable card for a man.


I made my main mat using Crafter’s Companion Regency Damask 8" Embossalicious Embossing Folder.  It's very hard to pick up embossing on matt card in photography, I hope you can see it here.  I very much like this range of 8" embossing folders, they are the perfect size for me, and this particular pattern is one I reach for time and again.

I finished the card off with a simple sentiment cut with one of my Tonic Christmas Cracker Sentiment dies and just a few tiny crystals to accent the holly berries.

So I have two exciting competitions to let you know about and what's great is you could combine entries into both with just one card.  

So first of all, do pop over to an Oldie but A Goodie and join in with our Clean & Simple Christmas Card Challenge for the chance to win a $21 prize from Bugaboo Digi Stamps.

Secondly, Tonic Studios have just announced a fabulous prize competition on their Facebook page, with the chance to win £300 of Tonic products.  Take a look at the Tonic Studios Card Competition here.

There are different rules for each competition so do check them out.  For example, for an Oldie but a Goodie Challenge, I've used the following items that are over 6 months old on my card: Embossing Folder, Stamp, Window Die, Ink Pad, cardstock, crystals.  For the Tonic Studios Card Competition, you need to use a Tonic product and I used my Tonic Window Box Die, Tonic Christmas Sentiment Dies and my Tonic Super Trimmer.  Obviously, I'm not entering (not allowed) but I do hope you will join in the fun on both challenges.  Here's one last look at my CAS Christmas Card.....

Pin It Now!

Saturday, 2 November 2013

Annabel & Friends Birthday Card

Hello, today’s card is for a little girl on her birthday and what could be more perfect than Kanban's Annabel with friends!   I've used a number of techniques on this card, can you spot them all? Look for:

Paper piecing  with stamping● Paper piecing  with die cuts ● Die Cutting ● Stitching ● Punches  ● Spritzing ● Accenting ● Stamping ● Colouring  Ribbon Layering  Hat Pin Making!


Card Recipe:
Stamp: Kanban
Colouring Mediums: Encore Ultimate Metallic Ink Purple, Memento Black Ink, Promarker Pens, Cosmic Shimmer Mist
Paper and Card: Deja Views, Textured, Joanna Sheen's Elegance Satin
Tools: Tonic Studios Love Arch Square Die Set, Tonic Studios Love Arch Border Punch, Tonic Studios Maria Butterfly Die, Tim Holtz Ruler
Embellishments: Organza sheer ribbon 10mm, May Arts Printed Sheer Ribbon, hand-made pearl Hat Pins


For my main focal image, I stamped Annabel onto Elegance Satin card using Memento ink.  I then stamped small offcuts of patterned paper with various elements of the stamped image (the doggie's bow, the teddy and Annabels, dress, cardigan and boots).  After colouring the main image with promarker pens, I cut out these extra elements and paper pieced them onto the image.

You can also just see the little die-cut heart, from the Love Arches Die Set, which I topped with a tiny mother-of-pearl heart button.

Then for a quite different effect, I used paper piecing again but this time using die cuts.  Using my Tonic Studios Maria Butterfly Die, I cut the out the entire die using textured mauve cardstock.  Then using offcuts of patterned paper, I cut the die again but only the flowers.  I then inset the patterned paper pieces into the main die.  Tweezers are a great help at this point!

To create the background layer, I used Tim Holtz ruler to pierce around the edge and then hand-stitched with white thread.  You just be able see that I also misted the entire background with Cosmic Shimmer Angel Mist, which givess any matt paper into a beautiful shimmery finish.  I also misted the small die cut heart in the above picture.


This small accented circle from Tonic Studios Love Arches Die set is just the perfect size for a sentiment and makes a lovely change from a standard scalloped circle.


Here's one final look at this little girl's birthday card

Hope you like this; do leave a comment and let me know what you think.
Pin It Now!

Tuesday, 29 October 2013

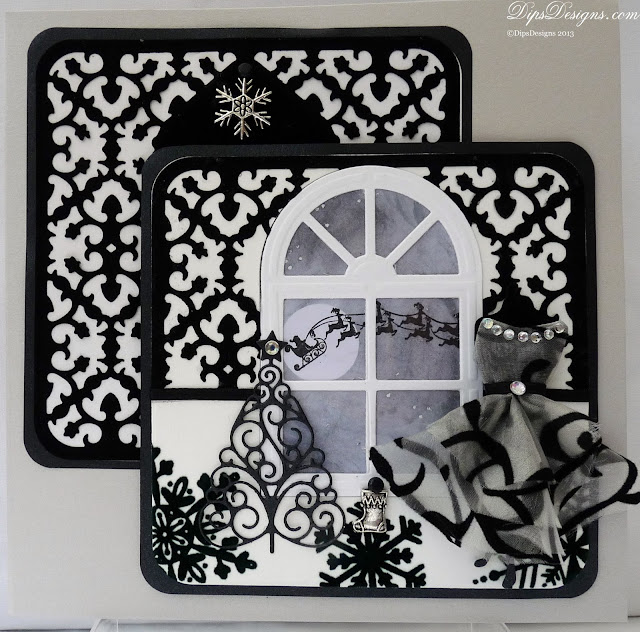
'Charming' Silver, Black & White Christmas Dress Card

Hello Blog Friends, I hope you like today's card, 'Charming' Black and White Christmas Dress Card! I always struggle with monochrome cards but I have to say, I am quite pleased with this one - let me know if you agree?
Charming Black & White Christmas Dress & Mannequin Card
Card Recipe:
Stamp:Kanban
Tools: Tonic StudiosMannequin Tag Die Set; Tres Belle Base Die Set; Domed Windows Die Set, Free Christmas Tree Die, Grand Calibur
Colouring Mediums: Versafine Ink Pad, Distress Ink Pads, Versamark, WOW embossing powder
Paper and Card: Stardream, Pearlescent White, Flocked Card, Velvet Paper
Embellishments: Organza Flocked Sheer, silver-tone Christmas Charms, rhinestone crystals, 3mm double satin ribbon.
It's our new challenge over at an Oldie But A Goodie and this fortnight the theme (picked by Natali) is 'Charming - use a Charm'.  Now whilst the inspiration for this card came from my brand new Tonic Die Sets (Tres Belle Square and Mannequin Tag), all the elements actually on my card are well and truly over 6 months old!  So, if you have lots (or even a little) old stash to use up, come on over to an Oldie But a Goodie and join in with this fortnight's theme with a chance to win a lovely prize.  So let's have a closer look at some of the elements on this card....
As soon as I got my Tonic Studios Mannequin Tag Die Set, I knew I wanted to make a dress card.  I started this card with the intention of making a dress-shop window with the dress behind the window.  However, once made, my dress was so full, it needed to go in-front of the window, so the whole concept of the card changed.

I made the dress by die-cutting 3 circles of a gorgeous swirl-flocked organza sheer fabric.  The circles were layered and gathered together to form the dress skirt.  I made the bodice by tracing around the bodice of the mannequin die and cutting it out before covering the top in a double layer of organza.  I stuck the skirt to the bottom half and used a narrow strip of double satin ribbon to hide the join.  A few rhinestone crystals added some bling for Christmas!
There were three stages to creating the stamped window scene.  Firstly, I wanted the effect of falling snow, which I did by tapping the end of a brush in Versamark Ink and tapping this onto my stamping card, before heat-embossing with opaque white embosssing powder. I then punched out a circle mask and coloured the rest of my stamping card with Black Soot Distress Ink. Finally, I removed the mask and stamped my Santa with Flying Reindeer in Versafine Black Ink.

I die-cut my window from white cardstock and backed it with an offcut of acetate (from some packaging heading for the bin!), before lining up my Christmas Sky scene behind it.

On this occasion, I've inlaid the window into my background card, it adds a stage to making your card but gives a more realistic finish.

Isn't the little stocking charm just so sweet?  But not as sweet as my Christmas Tree die cut - and that's because this die came for free (and there's nothing better than free) with a card-making magazine!


My photography doesn't really show this to well (apologies) but the damask background has been created from my new Tres Belle Square Dies, cutting a layer of black velvet paper and backing it with white pearlescent card.  

A second silver-tone charm, this time a pretty snowflake, adds to the 'Charming' theme over at an Oldie but a Goodie, do pop over and join in with this fortnight's challenge, they are always great fun and the perfect excuse to dig out old stash to use up.


So here's one final look at my card
This card was showcased in the following challenge:
Die-Cuttin Divas - Anything Goes Pin It Now!

Tuesday, 25 June 2013

A Kaleidoscope of Butterflies

Today's card may look a little familiar as it is a revamp of a card I did for my sneak peak of the new Tonic Studios Verso Dies.  The card was perfectly fine, (you can see it here) but I'd made it very quickly for the launch, and felt it needed something more. So, I did some titivating and now it's great for my fortnightly Design Team card for An Oldie But  A Goodie Challenge.  This fortnight our theme of Butterflies has been chosen by the lovely Natali.

Card Recipe: 
Stamp: Kanban Spring Trees & Butterflies
Colouring Mediums: 
Encore Ultimate Metallic Ink , Chipped Sapphire Distress Ink Pad
Paper & Card: Tonic Studios, Stardream, Textured Pearl
Tools: Tonic Studios Gothic Border Verso Die Set, Tonic Studios Gothic Border Punch, Tonic Studios Butterfly Srip Punch, Grand Calibur
Embellishments: Rhinestone Crystals, Glitter

To make this card, I die cut the mat from a lovely sheet of patterned card from the Butterflies Beautiful using the largest die pair from the Gothic Border Square set. I then stamped my Kanban tree image onto the mat with Encore Ultimate Metallic ink and heat embossed it with clear embossing powder.  I inked around the edge of the mat with Chipped Sapphire Distress Ink, to emphasise the Gothic Border and added a few accent crystal rhinestones.  In my original card, I didn't do anything more with this mat other than to mount it onto the background card layer.

However, when I went back to revisit it, I thought I would turn it into a Butterfly Tree.  To do this, I took a selection of card offcuts in a variety of colours.  Then I applied double-sided adhesive, covered them with glitter and used the Butterfly Strip Border to punch out a kaleidoscope of tiny butterflies.  The butterflies are  normally the waste from punching out the Butterfly Border Strip but these tiny flights of fancy were the perfect size to transform my stamped tree into a Butterfly Tree.  

For a little difference, instead of mounting my stamped image proud of the card front, I actually inset it by raising the surrounding layer on foam pads, and the new Tonic Studios Verso Dies are perfect for this technique.  I think it gives an interesting dimension to the card.


Finally, I cut a 4.2cm strip of coordinating card and punched both sides of it with the Gothic Border punch, before decorating with more rhinestones.

Please pop over to the main Oldie But A Goodie Challenge Blog to check out the gorgeous inspiration from my lovely DT buddies. To enter the challenge yourself, you can make anything you like Card, ATC, L/O etc as long as it fits in with the theme and that you use something on your project that is over 6 months old.  We're also sponsored for this challenge by Bugaboo Digi Stamps so there is a lovely prize up for grabs too.  My "oldies" are all my card stock, stamp, glitter, crystals and ink pads.  I'm sure you've also got lots of stash to use up too!
 
Thanks for popping by to see me today - you are always welcome - and I always look forward to reading any comments you may leave.
Pin It Now!

Friday, 21 June 2013

Another Tonic Sneak Peek - Star Box Die

As soon as I received my Star Box Die, I thought about doing a wreath-style card (I do like this style of card, I made a snowflake wreath card last year).  


Although I wanted to use the die-cuts on a card rather than as a 3D box, I still wanted them to have dimension.  So I trimmed away the flaps that give the box depth (super easy, even if you are scissor-challenged), and scored through each point of the star, folding to give it valleys and hills.


I edged the stars with a glue pen and added some glittery sparkle, and topped each star with a coordinating button.


This pretty Kanban Filigree Bell Ornament Stamp was the perfect partner to my star wreath.  I stamped it in red ink and heat embossed it with red tinsel embossing powder.


The final finishing touches included a lovely aqua satin ribbon bow and some sequins and rhinestones randomly sprinkled around the wreath.  My wreath-shaped card blank was cut using my Cameo Silhouette with the extra long cutting mat.

Don't forget to tune into Ideal World on Friday at midday and Create and Craft at 7pm and then again on Saturday at 5pm to see these dies and more! More details at Tonic Studios.

Card Recipe: 
Stamp: Kanban
Colouring Mediums: Pigment Ink Pad
Paper & Card: Paper Adventures, Elegance Satin, Stardream
Tools: Tonic Studios Star Box Die Set, Silhouette Cameo, Grand Calibur
Embellishments: Double Satin Ribbon, sequins, buttons, rhinestones
 
Pin It Now!

Saturday, 8 June 2013

Sneak Peak - Tonic Studio's New Verso Range!

Oh, how exciting - Tonic Studios are launching a brand new range of co-ordinating Dies and Punches as a Four Day Deal on Create & Craft on Monday!  I've been having a play with the Gothic Die Set and matching Gothic Border Punch, want to have a peek?


The Verso dies contain 5 dies in each set and allow multiple combinations of designs to suit your project.  Each Verso Die Set has a co-ordinating Simplicity Pattern Punch, allowing you to create beautiful repeatable borders and strips, especially as these punches can go through even 400gsm heavyweight card.  Being Tonic, these dies and punches are an absolute dream to use (no fiddling around with wax paper etc).

On my card, I used the largest medallion die and matching outline die.  I punched the border by cutting a 4.2cm wide strip of card and punched both sides to create this strip, which I then decorated with rhinestones.


Here's a final look as this gorgeous die set.  Don't forget to tune into Create and Craft at 8am on Monday 10th June to see the launch of these gorgeous dies.

More details at Tonic Studios.

Pin It Now!

Saturday, 16 March 2013

A Tribute to Kanban - Betsie Bob Cute Girl

I was very sad to learn that one of my favourite UK craft companies, Kanban, has gone into Administration and will be closing down.  Like many UK card makers, Kanban has featured frequently in my craft room purchases.  Kanban are best known for their lovely cardstock and card-topper kits.  However, I am also a really big fan of their range of acrylic stamps and you will find many varied examples of these on my blog, just click on Kanban Stamps in my labels list.  So today's card is a tribute to Kanban, and my thoughts are with all those at Kanban during these troubling times.


Card Recipe:
Stamp: Kanban Betsie Bob Cute Girls
Colouring Mediums: Memento Ink Pad London Fog, Promarker Pens
Paper & Card: Laura Ashley paper pad, Stardream, Hammered, Elegance Satin
Tools: Spellbinders, Grand Calibur,
Embellishments: May Art Floral Vine ribbon, Lace, hand-made pearl Hat Pins, metal corner, mulberry flowers, crystal glitter

I stamped my image with Momento London Fog and coloured with Spring Edition 2012 pro-marker pens.  I rounded the corners of the image and highlighted the edge with a glue pen and crystal glitter.
The card base was cut from a warm yellow hammered cardstock that I had in my stash.  The mounts were cut from stardream card using Spellbinders Romantic Rectangles.  The vertical panel tucked behind the stamped image was created by cutting the largest Romantic Rectangle in half, adding a pretty Laura Ashley paper and then accenting with some Laura Ashley flock rub-ons that I've had in my stash for years.  They are a bit fiddly to use but give a lovely result.   You can just see one in the bottom left of this photo.


To finish the card, I used a glue pen and crystal glitter around the edge of the card to echo the glitter on the stamped image. I trimmed the card with some lucious May Art Floral Vine sheer ribbon which is trimmed with sheer flowers with pearl centres (unbelievably gorgeous), cotton lace, mulberry paper flowers and my own hand made pearl decorative hat pins.
  I love to read your comments, they are a highlight of my day, so do let me know what you think of this or if you have any questions.  Thank You! Pin It Now!

Saturday, 29 December 2012

A Few of My Favourite Things

Hello and with today’s card I am well and truly back in my comfort zone, dress stamp, lavender and cream tones, mulberry flowers and decorative hatpins – all my favourite things!


Card Recipe:
Stamp: Kanban
Colouring Mediums: Memento Ink Pads, Promarker Pens, Tattered Angels Glimmer Spritz
Paper & Card: Kanban Lavender Rose Collection, Conqueror Wove
Tools: Spellbinders, Grand Calibur, Couture Creations Embossing Folders, Blending Mat
Embellishments: Lace, hand-made beaded Hat Pins, crystals, mulberry gardernia flower

My main image is a Kanban Cavendish Ladies Stamp, coloured with Promarkers, with the edges distressed with my blending mat and the corners accented with 3mm rhinestone crystals. I mounted this onto a mat cut from Spellbinders Romantic Rectangles.


The background is Kanban Lavender Rose collection cardstock embossed with Couture Creations Hedged Maze and spritzed with Tattered Angels Glimmer Mist for a subtle shimmer. The tag is also cut from the Kanban Lavender Rose Collection. I also cut accent pieces from Sue Wilson’s lovely Vintage Lace Spellbinders dies. I added a mulberry gardenia flower, which I had lighly dabbed with an ink pad, rosebuds, rhinestone crystals and a lace trim. Finally I tucked in 2 hand-made decorative Hatpins, if you would like to see how to make hatpins I have two tutorials on Creating Hatpins and More Decorative Hatpins, do take a look!


Hope you like this; do leave a comment if this has pleased you. Pin It Now!

Friday, 31 August 2012

Monochrome Magic

Hello. For this card, I wanted to try out a monochrome look as it is a new home card for a very modernistic couple. I have to admit, though, it’s not a style I’ll be rushing back to, whilst it is striking, it’s just not embellished enough for fussy me!!!

Card Recipe:

Stamp: Kanban
Colouring Mediums: Stazon Black
Paper & Card: Conqueror, Stardream Opal
Tools: Spellbinders, BigShot Pro, The Crafter’s Workshop Mask
Embellishments: Ribbon, crystals, glossy accents

Pin It Now!

Saturday, 16 June 2012

Damask Diva - Shaking her tail feathers!

Oh-La-La – this is a very theatrical card for a work colleague who is involved in Amateur Dramatics! There are lots of layers creating texture and, I hope, interest.

Card Recipe:
Stamp: Kanban
Colouring Mediums: Brilliance Black Pigment Ink, Promarker Pens
Paper & Card: DCWV, Centura Pearl Ivory, Stardream Black, Neenah stamping card
Tools: Silhouette Cameo, Spellbinders, BigShot Pro, The Crafter’s Workshop Mask
Embellishments: Feathers, Mulberry Gardenia, Cherry Blossoms & Rose Bud flowers, Satin Edge Sheer Ribbon 25mm, hand-made beaded Hat Pin, Crystals


I started this card making good use of my Silhouette Cameo; I made the A4 shaped card base (this is one of my favourite techniques now I have the extra long cutting mat) from Black stardream card along with the scroll frame and key. I used the mat tool to cut mats for the scroll and key from centura pearl, and I then embossed both of these in my Big Shot Pro with a 12” Crafter’s Workshop Mask.

My image is from Kanban’s Damask Divas stamp set and is one that I really love, stamped in Brilliance Black and heat embossed with clear embossing powder. I couloured the main image with Promarkers, but I also stamped the bodice onto an offcut of flocked DCWV card and cut this out. To this, I then attached a fibre thread as the lacing and black feathers at the base, then mounted the bodice to my main image. I cannot lie, this was very fiddly to do, but I was pleased with the effect!


To ensemble, I mounted the scroll frame and scroll key onto their respective embossed mats and decorated with rhinestone crystals. I threaded a lovely wide cream satin edge sheer ribbon around the card base, and mounted up all the layers. The stamped image was mounted onto the paper-pieced mat, and this was mounted onto the card, ensuring that the picot edge ribbon on the mat aligned with the same ribbon on the card. The card was finished with mulberry flowers, a hand-made hat pin and ribbon bow.


I am entering this card into the following challenges:
Bunny Zoe's Crafts Challenge - Girls, girls, girls


Hope you like this; do leave a comment if this has pleased you. Pin It Now!

Friday, 8 June 2012

Ship Ahoy!

With Father’s Day fast approaching, I thought I would share my card for my dear Dad. Now my Poppy will actually be arriving in New York on the Queen Mary2 on Father’s Day (that’s the way to spend Father’s Day in my book, just wish I was there too) so a nautical theme seemed appropriate!


Card Recipe:
Stamp: Kanban
Colouring Mediums: Memento Ink Paris Dusk, Promarker Pens, white gel pen
Paper & Card: Deni Mechelle Design for PaperWhite, Elegance Satin


Tools: Spellbinders, BigShot, Martha Stewart Punch, Tim Holtz RulerEmbellishments: Raffia, miniature bottle, starfish, shells, sand

I stamped the Kanban Stamp nautical image in Memento Ink Paris Dusk onto Elegance Satin card and coloured in with Promarker Pens. I then cut the image out with a spellbinders circle die but with 2 sections coming outside the die. This was mounted onto a spellbinders scallop circle, which I then doodled a faux-stitched effect to the outer edge with white gel pen.However my needle and thread came out for real when I hand-stitched the background textured pearl card. The larger mat had one edge punched with Martha Stewart Bubbles punch to compoliment the nautical theme.

I had the perfect papers in my stash for this card, a series of nautical designs by Deni Michelle for PaperWhite.

To finish the card off, I added a “Happy Father’s Day” message to the miniature bottle (an Ebay find) part filled with sand from Dunelm Mill. The shells were also from Dunelm Mill and the starfish was also in my stash along with my raffia.


Hope you like this; do leave a comment if this has pleased you. Pin It Now!

Saturday, 19 May 2012

On Your Retirement

My Mother asked me to make a “special” card for a friend of her’s that is retiring.
Special’s my kind of card making, and I love to make a coordinating box, with the card nestling in layers of tissue paper for that extra special touch.


This is also my first play with my extended Cameo Silhouette cutting mat – I used to the cut the fancy edge card blank with the matching frame. Very happy with the result. I will be using this technique again on other shapes – it was a doddle to do.


Card Recipe:
Stamp: Kanban
Colouring Mediums: Momento Ink Pad Cocoa, Brown Pigment Ink, Promarker Pens, Tattered Angels Glimmer Spritz
Paper & Card: Kanban Printed Cardstock, Stardream Opal, Opalescent Vellum
Tools: Spellbinders, Silhouette Cameo, BigShot Pro, Quickutz
Embellishments: double satin ribbon 10mm & 3mm, hand-made beaded Hat Pins, pearls, mulberry roses, gardenia & cheery blossom.

To make this card, using my Silhouette Cameo, I cut the card base from stardream cardstock, the frame from Kanban Printed Cardstock and the flourish background from Opalescent Vellum. Additional swirls were die-cut from a Quickutz die in my Big-Shot Pro from both the Kanban Printed Cardstock and Opalescent Vellum.

I then embossed an offcut of stardream card through my Big-Shot Pro using a spellbinders embossing folder. Once embossed, this offcut was paper-pieced together with an offcut of coordinating Kanban Printed Cardstock and the join was covered by a strip of double satin ribbon, then die-cut with Spellbinders Labels 1.

My brown pigment ink was not as deep as I wanted so I inked up the stamp first with a layer of Momento Cocoa and then added a layer of brown pigment ink. This was then embossed with clear powder and coloured with promarker pens. The finished image was then cut from the smaller Labels 1 die, using the ‘outside the die’ technique so that the tassle came below the cut line of the die.
I printed my greeting onto an offcut of Kanban Printed Cardstock and die-cut it out.


To ensemble, I mounted the flourish background onto the backing card, topped off with the frame and inked all the edges. The mounted stamped image and greeting were added . To embellish, I used mulberry paper rosebuds, gardenia & cheery blossom flowers, handmade HatPins, flat-backed pearls and a double-satin ribbon bow. Finally, the entire project was spritzed with Tattered Angels Glimmer Spritz, for a subtle shimmer.

Hope you like this; do leave a comment if this has pleased you. Pin It Now!

Monday, 7 May 2012

Keep Calm & Have a Bath!

And Relaxxxxxx! Girly and feminine, this card is for all ladies who love a pampering soak (and that most definitely includes me)! This multi-dimensional card also features a hidden message tab, slotted into the folds.

Card Recipe:
Stamp: Kanban
Colouring Mediums: Encore Ultimate Metallic Ink, Promarker Pens
Paper & Card: Kanban Printed Cardstock, Kanban Foiled Cardstock, Stardream Opal, plain burgundy
Tools: Spellbinders, BigShot Pro, Tim Holtz Ruler, Martha Stewart Punch Around The Page, Heat Gun, Guillotine
Embellishments: Satin-edge sheer ribbon 10mm, hand-made Pearl & Crystal Hat Pin, mulberry flowers, Pearl Brad, crystals

To make this card, using my Guillotine, I cut the card base from stardream cardstock, and the mats from Kanban printed and foiled cardstock and plain card. The hidden tab was punched out using Martha Stewart Punch Around The Page. To echo this on the front of the card, I used my Tim Holtz Ruler to pierce holes all around the edge of the top cardstock layer.
The lovely bath stamp is by Kanban image, which I inked up Brilliance Pigment and then embossed the image with clear embossing powder and a heat gun. I then coloured the image with Promarkers.


I am entering this card into the following challenges:
Bunny Zoe's Challenge - Ribbon or Twine
Really Reasonable Ribbon - Feminine
Stampin for the Weekend - Layers
Dream Valley Challenges - For a Special Lady
Oldie But Goodie - Dies & Punches
Crafts&Me - Favourite Colour Combo

I love to read your comments, they are a highlight of my day, so do let me know what you think of this or if you have any questions.  Thank You!
Pin It Now!

Sunday, 22 April 2012

Simply Special

Hello and today’s card features a number of different techniques, but hopefully combined into an elegant, classy card – as that’s was my aim! So can you spot all the techniques? Look for:

Paper piecing ● Ribbon threading ● Distressing ● Embossing ● Digital Die Cutting ● Manual Die Cutting ● Glittering ● Spritzing ● Flower embellishing ● Accenting ● and (of course) Hat Pin Making!!!!

Card Recipe:
Stamp: Kanban
Colouring Mediums: Encore Ultimate Metallic Ink Blue, Brilliance Black Pigment Ink, Promarker Pens, Tattered Angels Glimmer Spritz
Paper & Card: K&Company Elegance Shimmer, Stardream Opal
Tools: Spellbinders, Silhouette Cameo, BigShot Pro, Anna Griffin Ribbon Punch, The Crafter’s Workshop Mask
Embellishments: Berisford satin picot ribbon 10mm, Berisford double satin ribbon 10mm & 3mm, hand-made beaded Hat Pins, crystals, pearls, mulberry cherry blossoms, pearl-ended stamen

To make this card, using my Silhouette Cameo, I cut the card base from stardream cardstock, and the flourish background & birdcage on K&Company Elegance Shimmer. This is the first time I have tried an entire background die-cut, it was a bit fiddly to then marry the flourish with the backing card shape but worth it.  The ribbon-edged border was cut from more K&Company Elegance Shimmer with an Anna Griffin ribbon punch and threaded with 3mm double satin.

I then embossed an offcut of stardream card through my Big-Shot Pro using my Crafter’s Workshop Paradise Mask as an embossing folder. Once embossed, this offcut was paper-pieced together with an offcut of coordinating K&Company Elegance Shimmer patterned paper and the join was covered by a strip of picot edge satin ribbon, then die-cut with Spellbinders Labels 1.

I didn’t have the right colour ink to coordinate with the soft greys in my patterned papers, so I first stamped my Kanban image with Brilliance Pigment Black onto spare paper, and (without cleaning the stamp), re-inked with Encore Ultimate Metallic Ink Blue. The residual black toned the blue down to a soft blue-grey – perfect! The stamp image was then faux cut from the smaller Labels 1 die.

To ensemble, I mounted the flourish background onto the backing card and inked the edges with Pro-markers. Next, a strip of picot-edged ribbon went across the lower middle horizontally and the threaded ribbon border was added vertically and the edges trimmed to shape. The stamped image was mounted onto the paper-pieced mat, and this was mounted onto the card, ensuring that the picot edge ribbon on the mat aligned with the same ribbon on the card.

The bird-cage was distressed with Promarkers, glittered and embellished with a rhinestone crystal before being tucked behind the mat along with hand-made hat pins.


I added cherry blossom flowers, rosebuds, pearl-ended stamen, flat-backed crystals and pearls and a double-satin ribbon bow. Finally, the entire project was spritzed with Tattered Angels Glimmer Spritz, for a subtle shimmer.

I am entering this card into the following challenges:
Bunny Zoe's Crafts - Ribbon or Twine
 Hope you like this; do leave a comment if this has pleased you.


Pin It Now!
Related Posts Plugin for WordPress, Blogger...